
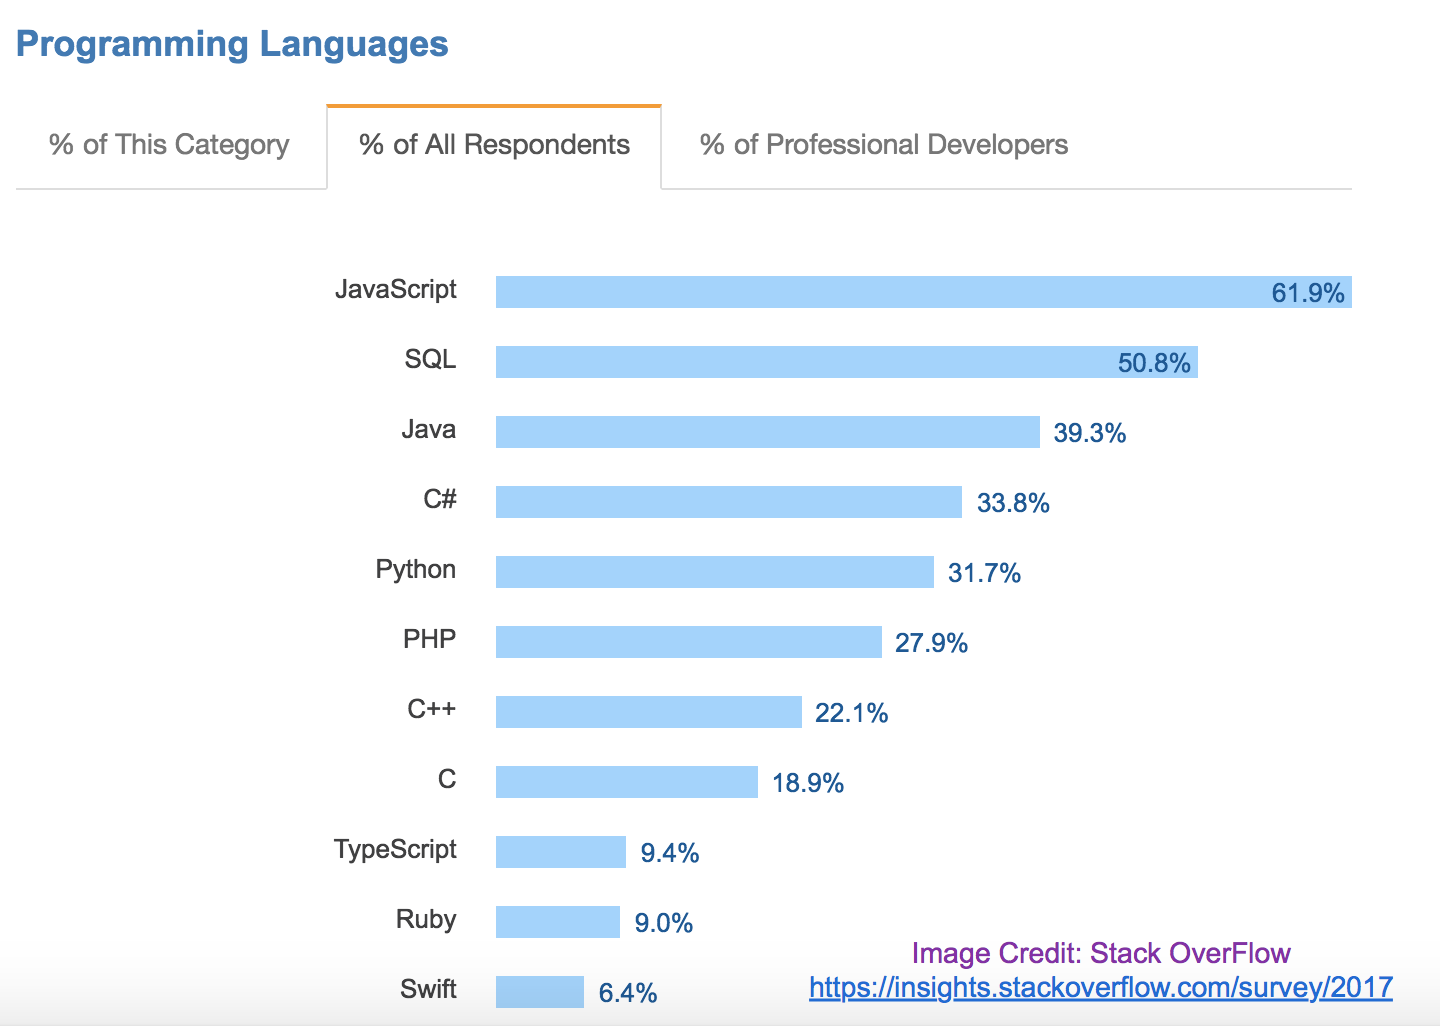
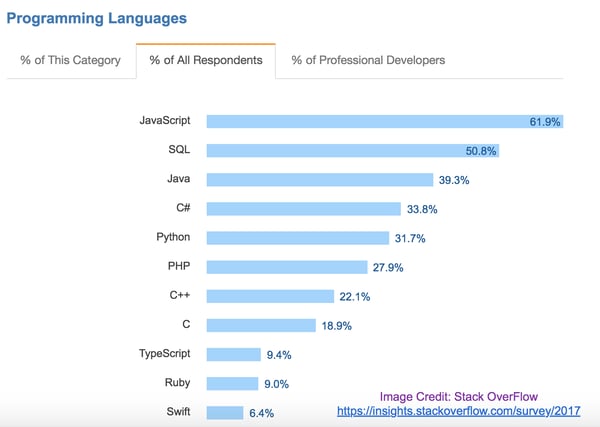
SQL (Structured Query Language) will be in its mid-forties later this month having been introduced by its creators Donald Chamberlin and Raymond Boyce in the 1970s. Given its age, it isn’t so hard to understand how the 2017 Stack Overflow Developers Survey uncovered that SQL is the second-most common programming language, used by 50% of developers and beaten only by JavaScript.
 (Image: SQL second most used programming language based on survey results from https://www.stackoverflow.com)
But even if many people “know” SQL and have used it to query a database before, thinking through how it could be used to query an endpoint is a relatively unfamiliar application, made possible only a short four years ago thanks to the open-source project, osquery.
Those who’ve dabbled in osquery already - or are actively considering it - have likely perused the SQL introduction for osquery documents provided on the osquery website. These docs are certainly helpful, but don’t necessarily follow an early learner’s natural progression. What we’ll explore here in both video and written format is a SQL introduction for osquery filtered by what we’ve learned through a variety of deployment experiences. I’ve tried to apply a logical progression for learning simple to complex SQL query structure as it applies to the first few days/hours of tinkering with osquery.
"Think of this as your SQL for osquery 101 – to be used as your “what now” guideline immediately following your osquery installation."
SQL 101 – SQL Introduction for osquery
Note: This demonstration assumes an extremely basic knowledge of system administration and SQL, and that you already have osquery installed on your system. As a reference, osquery uses a SQLite syntax. If you have questions on SQL syntax outside of what's included in this SQL for osquery tutorial, I recommend SQLite.org as a great reference tool.
Before we jump in, it is helpful to know about dot commands in osquery. My two favorite are .help which will give you a list of all “dot” commands (osquery’s built in shell commands) and .tables which will show you all of the tables available in the instance of osquery you have installed.
What we’ll cover:
- Launching osquery
- Getting Started with Basic Queries
- Common Query Refinements
- Joining Tables
Launching osquery
Let’s start by launching osquery interactive using sudo.
| Bash$ sudo osqueryi |
We use sudo to launch osqueryi because osquery runs in a user context. If your user context is a normal user and you attempt to query some of the system databases that have access to sensitive information, user context and permissions may prevent you from seeing some of this sensitive information. So, if you run osquery in an elevated mode, you have access to all the system tables. If you haven't seen osquery before, the interactive mode is a simple command shell that supports interactive SQL queries and some help commands.
Basic Queries
There are a lot of tables in osquery which means lots of interesting things we can ask of our endpoints. We're only going to cover a few for the purpose of illustration, but reviewing these basic queries should get you thinking about how you can tackle all kinds of problems in osquery. We’ll start with simple queries, and build more complicated ones as we go. Be thinking about how you can enhance any queries you make as you learn how to build more complex ones in this tutorial.
Uptime
We’ll start with the osquery equivalent of “hello world” by querying the uptime of the machine.
| select * from uptime; |
Which returns something like this: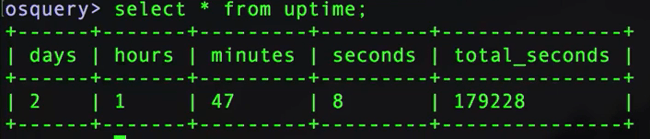
With this, we can see that my computer's been rebooted a little over two days now.
Users
There are a lot of users on your average macOS or OS X computer, but no simple way to see a list like there is with Windows from the command line. You can look at the users in the UI, you can parse the password file, but there's not just a simple way to say, "Hey, let me see the list of users." With osquery, we can get to this list for macOS by running this command (refined to limit results to 5 - more on query refinements later).
| select * from users limit 5; |
Which will return something like this:
You’ll notice that this brings back quite a lot of information - much of which we don’t need. This is where understanding some query refinements comes in handy.
Query Refinements
There are many ways we can narrow down what we see from osquery so that we get just what we need/want to see. Let’s explore some of these as they pertain to the users table.
Limit
For those of you following along chronologically, we already used this refinement above so consider this a refresher. Add a limit to control the number of items returned by your query by specifying exactly how many you want to see. In the query below, we’re asking osquery to return only five users.
| select * from users limit 5; |
Count
In a scenario where we did not limit the number of users returned, the count function can be used to provide the total number of users.
| select count(*) from users; |
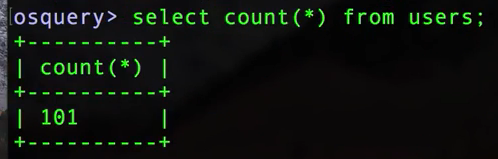
Simple - we have 101 users. You can imagine what our screen would look like if we had 101 individually returned results here.
Multi-Line: Query Style Preference
As somewhat of a side note, osquery supports both single line and multi-line queries. As the complexity and number of attributes you’re pulling into a query grows, you’ll start to instinctively understand when and where multi-line will make life easier. One benefit of single line though, is that you can hit the up arrow to get your last query back which can be a nice shortcut for continuing to refine that query. To illustrate, the two queries below will work the same way:
Single-line:
|
select uid, gid, username, description, directory from users limit 5; |
Multi-line:
|
select uid, |
Let’s go ahead and run this command in multi-line format and see what we get:
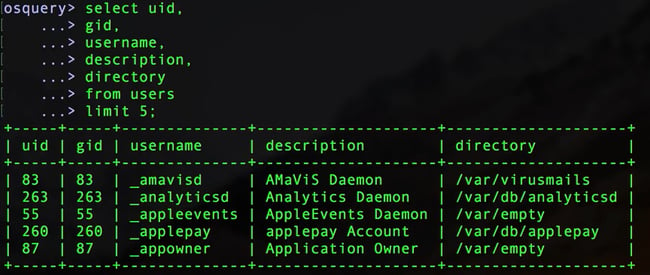
One other thing to note, these aren’t ordered by user ID because we didn't actually instruct any sort of ordering so this is actually ordered by the description column because osquery uses alphabetical order by default. You could change that though, and order it UID, the GID or any of the other facets here.If you want to order the results, you would add the following:
| select uid, gid, username, description, directory from users order by uid limit 5; |
And that would present the data ordered by the UID column instead of the default description column (the description column is first alphabetically, and then the data there was ordered alphabetically in the original query). You can also do ASCending or DESCending:
| Order by <column> asc |
or
| Order by <column> desc |
Filtering Results
Let’s say you wanted to narrow in on a specific attribute for further analysis or observation. In this case, out of the 101 users we have, we want to see just the users running in Daemon. We can tell osquery to filter our results for a partial match using %daemon% before and after the attribute we’re refining on. If we were looking for something specific and knew the exact value, we would use “=”.
| select uid, gid, username, description, directory from users where description like '%daemon%'; |
Which returns - you guessed it - the subset of our 101 users where the description includes Daemon.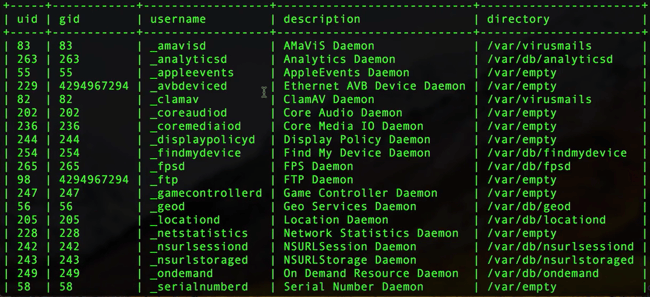
For more information on using percent and equal operators, check out SQLite documentation or this more advanced article on wildcards and globbing in osquery that my colleague wrote.
Joining Tables
In osquery, we can connect two tables worth of information together by a common column. In the structure of the query, you’ll need to include the tables you want to join, the columns of data you want to see returned from those tables, and the common column that you wish to join them by. In this example, we’ll be combining the processes and user tables by the shared uid.
|
select p.pid, |
Look closely, because there are some other handy tricks here. I’m aliasing the processes table to P, and the users table to U, just so that I don’t have to write everything out. In the select, we're saying for the processes table, select the PID column and the name. For the users table select the username column, and then join them together on the UID column, which both tables have.
This multi-line command will return a nicely refined result, like this: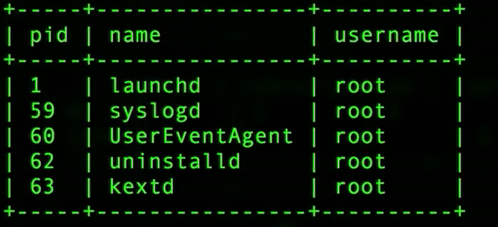
Now you've easily got the PID and the name of the service, and you've got the username of what it's currently running as.
Additional Resources
And there you have it - you have now completed our SQL introduction for osquery. You’re now familiar with launching osquery, running some standard queries like uptime and users, handy tricks for refining queries and joining tables by a shared column.
Want more? Check out the video below to review everything in this article AND some bonus work starting around the 8:30 minute mark where we do some more advanced joining and refining of users, open sockets and processes. Once you've mastered this SQL introduction for osquery, check out 6 Basic Tasks for macOS System Monitoring with osquery.
Related osquery resources: